
The corner beads are a product that makes the corners of your sheetrock appear professional. The corner bead protects the corners and soffits on your wall and allows you to apply the first coat joint compound. The bead will protect your sheetrock from any damage or cracks that may result from movements in your home.
The traditional metal corner bead has been used for decades in residential applications, and it is still the corner bead of choice. Vinyl corner beads have an advantage over metal because they are flexible and can be bent while still maintaining their shape. They can also be used for archways and curved walls. They also offer corrosion protection. Vinyl corner beads come in hundreds of shapes and can be flanged to cover corners that are not standard.
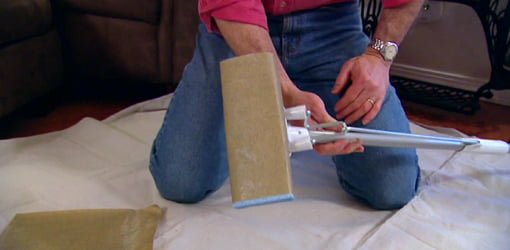
Vinyl beads are more resilient than metal and can withstand more impact than metal. This is especially useful for homes that live in areas where there is a high chance of temperature or humidity changes. You can attach a vinyl bead with screws, nails or other fasteners. Another option is to use a drywall glue. A clincher is a tool that can create a bullnose with a round shape or a 90-degree corner bead. However, a clincher can't be attached to a paper or plastic cornerbead.
Drywall clinchers work in the following way: Drive a metal cornerbead into your drywall. The clincher then holds the bead together. You can also use the rubber mallet to ensure that the bead sticks to the drywall. A clincher can be used to make a straight bead. This will save you time and money. It also gives you a professional look. Apply a mud or all purpose joint compound to the corners before you start taping.
These corner bead system have made great strides in the last few year. The latest methods for ensuring that a wall is bonded to the bead are both efficient and cost-effective. Trim-Tex offers a vinyl product made of 70% recycled materials. This bead can earn LEED credits. Its laminated papers coating give the bead a higher overall price and more resistance to dents or chips.
Grabber PanelMax can also be used. This tool makes it simple to create laser-accurate straight cut in your drywall. This tool is also great for outside corners. Unlike a clincher, PanelMax is designed to remove the gypsum from the face of your drywall before it is taped.
There are many suppliers that offer different options. You can order samples, or search online for a retailer that stocks the product. To help you get into the joint compound like an hook, you can also purchase a drywall cementer. The right mud lock will help to reduce the labor required for installing a corner beam.
FAQ
What can I do to save money on my home's renovation?
Doing the majority of the work yourself can help you save money. One way to save money is to try and reduce the number people who are involved in the remodeling process. It is also possible to cut down on the cost of materials during renovations.
How many times should my furnace filter need to be changed?
The answer will depend on how often your family is going to use your heating system. Consider changing your filter frequently if your family plans to leave the house during cold weather months. However, if you rarely go out of the house, you may be able to wait longer between changes.
A furnace filter can last about three months. This means you should change your furnace filters once every three months.
You can also consult the manufacturer's recommendations regarding when to change your filters. Some manufacturers recommend that you replace your filter after every heating season. Others suggest waiting until there are visible dirt deposits.
What should I do first in a house renovation?
Clean out your home and get rid of all clutter. Next, you will need to eliminate mold, repair or replace any damaged walls, repaint your entire interior, and fix any leaky pipes. Finally, you need to clean off the exterior surfaces and apply fresh paint.
Statistics
- It is advisable, however, to have a contingency of 10–20 per cent to allow for the unexpected expenses that can arise when renovating older homes. (realhomes.com)
- Design-builders may ask for a down payment of up to 25% or 33% of the job cost, says the NARI. (kiplinger.com)
- On jumbo loans of more than $636,150, you'll be able to borrow up to 80% of the home's completed value. (kiplinger.com)
- ‘The potential added value of a loft conversion, which could create an extra bedroom and ensuite, could be as much as 20 per cent and 15 per cent for a garage conversion.' (realhomes.com)
- A final payment of, say, 5% to 10% will be due when the space is livable and usable (your contract probably will say "substantial completion"). (kiplinger.com)
External Links
How To
Do you prefer to renovate the interior or exterior?
Which one should you do first?
When choosing which project to begin with, there are many things to take into consideration. The most common factor when choosing a project is whether it is old or newly built. There are many factors to consider if the building is older, such as its roof, condition, windows, doors and flooring. The location, style, number of rooms and size of a new building are all important aspects.
If your building is very old, you should first look at its roof. You might consider starting the renovation immediately if the roof appears to be in danger. If the roof is fine, then you can move onto the next step. Next, check out the windows. Next, inspect the windows and make sure they are clean. After that, you can go through all the doors to make sure they are clear of any debris. Then, if everything seems okay, you can begin working on the floors. You should ensure that the flooring does not crack or become unstable no matter how many times you walk on them. These steps will be completed before you can proceed to the walls. Take a look at the walls to see if any cracks or damage are present. If the wall is fine, then you should proceed to the next step. After the walls have been inspected, it is time to inspect the ceiling. You should inspect the ceiling to ensure that it can withstand any weight you put on it. If all is well, then you are ready to move on to the next phase of your renovation.
If the building was newly built, you'd probably start with its exterior. Examine the exterior of the house. Is it clean? Is it free from cracks? Is it in good condition? If the exterior looks bad, it's time to make improvements. It is not a good idea to make your home look unattractive. Next, examine the foundation. You should repair any foundation that appears weak. Also, make sure to inspect the driveway. It should be straight and level. It should be smooth and flat. If it isn’t, you need to fix it. You should also inspect the sidewalk while you're checking your driveway. If it's uneven, then you should probably replace it.
Once these areas are checked, you should move on to the inside of the house. Look at the kitchen first. Is the kitchen clean and well maintained? If it is unorganized, it should be cleaned. Next, make sure to inspect the appliances. You should make sure that they are in working order and in good condition. If they aren't, then you should either buy new ones or fix them. Check the cabinets after this. If the cabinets are stained, or have been scratched, you can probably paint them. If they are in good order, you can move onto the bathroom. Here, check the toilet. If it leaks then it's time to replace it. If the surface is just dirty, it should be washed. Next, inspect all fixtures. Make sure they're clean. You should clean them if they are stained. Finally, make sure to inspect the countertops. If they are chipped or cracked, then you should probably repaint them. Use a sealant if they're shiny and smooth.
The last step is to check the furniture. You should make sure nothing is broken or missing. If something is missing, then you should probably find it. If it is damaged, you should probably fix it. Once everything is checked, then you can move back outside and finish the job.